Showing posts with label Homemaking. Show all posts
January 21, 2015
A Better Perspective
"Which store do you hate more?" My daughter is asking me right before I leave.
I pause, thinking, weighing the options.
Which do I hate more? She only used the word hate because she's heard it from me before.
Finally, I form an answer, "Whichever one I am going to at the time."
We share a laugh, and I leave to go to the grocery store.
Grocery shopping and I are not on good terms. I actually do hate the task and the stores. I have for years.
For awhile, my sweet husband took over the task. I'd make the list and he would go. But it became cumbersome when his work hours increased. When that happened, naturally, the chore became mine again. I did not embrace it. Instead, I complained. I still do.
It most certainly did not become any better this summer when I went to gluten free, soy free, dairy free, and peanut free eating. I complained even more. There was no silver lining in grocery shopping for me...until this past Tuesday.
I was off to the store, again. My bad attitude kept me company through 2/3 of the store.
Stooping down to the bottom shelf, I hauled spring water up into my cart. Three gallons of the four were situated in the cart when I overheard a couple of people talking.
"Yeah, I had no idea I needed to be lactose free and soy free," the elderly lady chuckled as she spoke. "Use to think it was my momma's cooking making me ill. Then, when I got older and married, I still spent half my nights stooped over with stomach cramps."
"Oh, my," her comrade says.
I'm not sure I should interrupt and share my own food intolerance experience. It doesn't quite seem right. So, I don't. I move on.
Through the aisles I tread. Picking up items and crossing them off the list. I've forgotten the requested dip for a party we will host on Saturday. Actually, I can't find it. The store has rearranged and I haven't a clue where the new dip section is located. It isn't where I think it should be, so I keep scanning the dairy shelves.
Finally, utterly frustrated, I leave my piled high cart smack dab in the aisle and inspect the shelves closely. Behind me a gentleman sighs and heaves his own cart over to the side. He's speed shopping and narrowly misses the obstacle of my cart.
Oh, I'm being rude. The thought dawns on me. In my frustration, I selfishly dismissed all the other shoppers. And, this, realizing that other people are here in the store also is what strikes me. Instead of hating the task and the store, perhaps I should see it from a different perspective. Maybe, just maybe, I shouldn't be gritting my teeth through the aisles. Maybe I should be smiling at the other shoppers and speaking to a few of them. It is something I do everywhere else. I talk to others at the library and post office. I smile and make polite conversations. Never at the grocery store though.
Entering the check out, I ponder the thought. Has my hate for grocery shopping really skewed my perspective that much?
My groceries rest on the belt awaiting the scanner. The cashier is now ready to wait on me. She comments on my box of hair color. I'm not sure it is really a compliment and my bad attitude wants to rise to the occasion. However, I remember my diary aisle rudeness and my perspective ponderings. It helps that the speed shopper has whisked his items through the self check out next to me. I swallow hard and smile, forcing myself to forget about my grocery shopping dislike and concentrate on the person before me.
We end up having a lengthy conversation about hair color, divorce, computer dating, and children. I did have a lot of groceries. So, we had time.
Leaving the store, I realize how much hating grocery shopping has affected my perspective and experience while in the grocery store. Not just my experience...all those who came in contact with my grumpy, bad attitude grocery shopping self. Was I a shining light of His love and grace? Certainly not.
Determined to have a better perspective next time,
Dorie
December 18, 2014
Homemade Gifts for this Year
Every year, we try to give some homemade gifts. This year, with a frugal mindset, I hoped to give more homemade than ever. However, I wanted to keep it simple. Below is a round up of our homemade gifts this year.
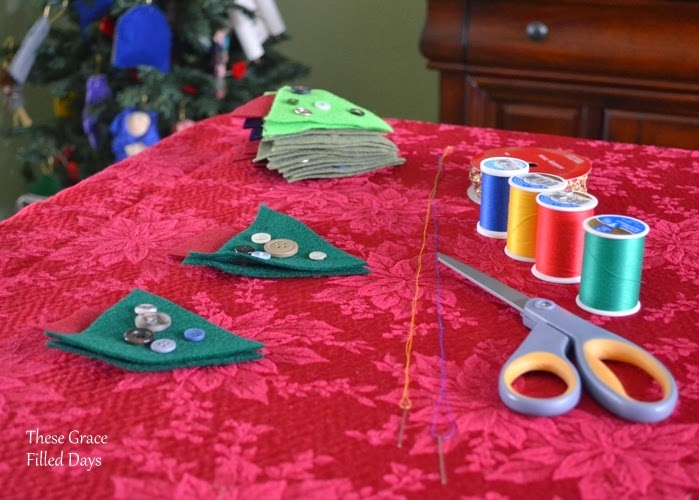
For the Christmas tree felt ornaments, our children cut triangles and rectangles for the basic shape of a tree. Buttons were sewn onto the front for ornaments. Trees were assembled with a bit of cotton stuffing to round them slightly. {Full post here.}
An easy project to complete using water color paper and sketch paper. Paint a design on a single sheet of water color paper. Allow to dry completely. Fold in half. Gather a few pieces of sketch paper and carefully crease each one. Place inside the water color cover. Sew straight up the center. Tape the outside. {Full post here.}
Colorful hot pads were made from fabric scraps. Inspiration and instructions found here.
Looking for an economical way to make Christmas gift tags, I turned to last year's Christmas cards. Some were easier than others to use for this project. {Full post here.} An alternative idea using name tag labels can be found here.
Years ago, I made my nieces doll quilts. However, I wasn't so sure a doll quilt would be a good idea for a rough and tumble boys. Instead I used fabric scraps, and created a portable toy car mat for my nephew. {Full post here.}
To freshen any house, a gift of Christmas Potpourri could be made and given. My oranges did not fit in our jars. Instead I used a red and green plaid plastic bag which we had left over from last year. Recipe and printable tag are found here. My husband and I tried out the recipe one evening. The warmed spices floated through the houses creating a wonderful aroma.
I also made scarves for my daughters out of a few old dresses and a photo book for my parents. Instead of the typical family picture album, I created a book full of all my favorite 'artistic' photographs for them to enjoy.
Next year, I hope to increase our homemade gifts even more so I've been busy collecting ideas.
~ Dorie
You can read about our past homemade gifts from 2010, 2011, and 2013 as well.
December 9, 2014
Sound of Music Themed Party
She was eleven going on twelve. And, she loves The Sound of Music! What better than a Sound of Music themed party to celebrate her special day?
We started with themed telegram invitations. Our inspiration was found here and here. For ours, we printed the telegram on a field of blue, named our telegram company Bloom & Grow, and created different regions to suit the specifics for our party. Each invite was printed on card stock and placed in an envelope for delivery. For added little touch of feminine elegance, I cut tracing paper to overlay the telegram like vellum in a fancy invite.
For decorations, we simply added Sound of Music touches about the house, including pictures from the original film, books about The Sound of Music, lyrics from my daughter's favorite songs, and a guitar!
Food was easy. Snacks were my daughter's favorites. For a little Sound of Music flair, we added some apple strudel like treats to the menu. Unfortunately, I utterly forgot to bake them prior to the party. Which meant, our family enjoyed them later that week while remembering the fun of the party.
The cake was super easy. We ordered it. Seriously, I was not taking on Maria. I've done many of cakes for my children's themed parties, but a Maria likeness was far more than I could do. Our favorite bakery opted to do an edible screen shot. Since it was just what the birthday gal wanted, it was perfect!
All the games were music or The Sound of Music themed. We played hot potato, musical notes (like musical chairs, but with musical notes which children stepped on instead of sitting), and trivia. All the grown ups were invited to play along with the trivia. Two word games were prepared. One was an unscrambling word activity. Each word was one of the birthday girl's favorite things. The second game was trivia about The Sound of Music movie. Questions were found online.
Of course, we played the Broadway musical sound track, which was found at the library, throughout the party. And the favors had to be little brown packages of boxed candy tied up in string!
~ Dorie
For more Sound of Music party theme ideas, check out my Pinterest board.
Library books we displayed during the party:
The Sound of Music Family Scrapbook
The Sound of Music Companion
My Favorite Things
V Is for Von Trapp: A Musical Family Alphabet
December 4, 2014
Simple Autumn Centerpiece
Technically, it is still autumn. While we are celebrating the Christmas season, the actual season is fall, not winter. Sure, that all changes in a couple of weeks right before Christmas Day, but right now...it's fall. That's my disclaimer for sharing this easy-to-make, frugal, but clearly Thanksgiving-like autumn centerpiece in the midst of the Christmas season.
It all started with these gold leaves. My mom had seen the idea in a magazine or on a tv show. You simply gather leaves and spray paint them gold. The gold leaves could then be used to decorate your Thanksgiving day table. She planned to do this with the grandchildren during a recent visit to their home.
After the visit to Grandma and Grandpa's house, our children brought a small pile of gold leaves home with them. The shimmer of the leaves was beautiful and our children wanted to put them on display in their rooms and on our dining room table. Since I had been wanting to add an autumn centerpiece to our table, I encouraged both ideas.
Using a wooden tray, two leaf candles, which had been bought off the clearance rack, wax paper, and the golden leaves, we created a simple autumn centerpiece.
First we lined the wooden tray with wax paper, and placed the candles on top. The children then gingerly positioned each leaf 'just so,' and viola, we were done. A simple-to-make autumn centerpiece graced our table for a few weeks...until the Christmas decorations appeared.
~ Dorie
Reminder: Do not light candles around dry leaves.
September 22, 2014
Frugal Sewing Projects
As Autumn approaches, my thoughts turn to a few sewing projects...
I am looking forward to starting a scrap quilt of autumn colors. The backing will be made from an old table cloth. It was bought years ago for a table we no longer have. As it is too small for our dining room table, it makes sense to either use the fabric or give it away.
One of my favorite things to do is to use supplies I already have on hand and create something new. Whether I am repurposing an old vase into a utensil canister or using old jeans to make a sling back bag, I enjoy using what I've got in a new way.
Perhaps this is one of the most frugal tips out there: use what you have before you go buy something new.
However, it isn't always easy to come up with new ideas or uses for material you already have. Maybe one of these eight projects will inspire you.
~ Dorie
Frugal Sewing Projects which use material you already have...
Spring Scarf from a dress
Apron from a girl's dress
September 8, 2014
Family Hand Print Art
After seeing this art work, I knew I wanted to try something like it. I just didn't know what or how.
Weeks passed and no inspiration came to me, at least anything I really wanted to make. I let it go.
It wasn't until planning my oldest son's world history class did I finally find the creative idea I had wanted months earlier. Incorporating a personal family tree into his studies was an ideal way to make his history studies more meaningful. Even the little I know of our family ancestors is fascinating. Between settlers, colonists, and immigrants our children are blessed with a variety of brave, self-sacrificing individuals, who's lives have brought forth much fruit which we enjoy today.
At first, I thought I would try to place all our hands together into some type of tree, but I wasn't sure if it would look like I envisioned. Six hands could be tricky. I wasn't sure if I'd get the placement right, and I wanted to be able to see each individual hand. A family tree would be nice though.
Looking at the history, I thought about all those before us. Each had a family tree. Roots. Trunk. Branches. Leaves. Each one of us has a family tree, too. In a way, we are a forest. Maybe we could try a forest of trees.
Not wanting to give up on the singular family tree idea, I asked my family to add their hand print to both designs. I'd decide after the handprints dried. {For the hand prints, I used muted colors which match our dining room. It was easily done with acrylic paint brushed on a hand and pressing the hand onto white paper.}
In the end, I couldn't make the one tree look like I wanted. So, instead, I pursued the forest idea.
Once the hand prints dried, I painted dark brown trunks and branches over the hand prints.
It was then that I measured and set off to the craft store for a frame...only to learn I had used an 'odd' sized paper. No off the shelf frame would perfectly fit! Back home, I measured the actual art portion to decide if I could crop it. Unfortunately, there wasn't much room to crop. Six hands filled the sheet.
Days passed as I pondered.
Finally, I decided to purchase an on-sale slightly bigger frame that came with a thin mat and filler cardboard. Using the mat as the back drop, I glued strips of burlap at the top and bottom. This burlap would add some texture, but more importantly make the art work the right size for the frame. Once the strips of burlap dried, I positioned a clean sheet of paper over the burlap pieces. This was to ensure the burlap did not show through the family hand print art work. Finally, I eased the forest print onto the very top, and secured it.
Once I placed the forest hand prints into the frame, I loved it, and knew just where I wanted it to hang.
I had picked the colors to match our dining room. I just assumed I would hang it off to one side. Yet when it was done, I wanted the family hand prints to hang in a more prominent place. Above the secretary desk seemed the perfect place, and I couldn't be more pleased.
~ Dorie
{Two of the hand prints are on the light side. If I redid this project, I would pick colors of the same darkness instead of trying to vary the tones.}
August 22, 2014
Frugal Utensil Canister
Since I was never sure I really wanted my larger utensils crowding our limited counter space, I never sought a large utensil canister.
However, when my large glass candle burned out, I suddenly had a space. It was really good for nothing else, either a candle or a canister.
Considering I am trying to run a household with frugality in mind, I opted for whichever we had on hand. Larger candles are scarce. Only the Christmas scents are left in the drawer and it isn't Christmas time. I did find a smaller birthday cake scented candle which I thought would work for scent, but it was too small to fill the space on its own.
Only then did I consider a large utensil canister. In doing so, I would be creating a bit of space in one drawer which currently housed the larger utensils. It seemed like a good idea.
What to put them in was the next dilemma. Looking through my house, I sought something I liked which had no other use. I didn't want to empty the container each time I needed it. That seemed silly. In the end, I found a vase of sorts. However, it was too high, and I wasn't completely comfortable placing utensils which were going to be used on food inside a questionably clean surface.
That's when I found a large plastic cup fit nicely inside the vase.
Wedged inside the vase, the plastic cup created the perfect depth for the larger utensils and could be easily kept clean. It was perfect! Did I mention it cost me nothing since I had it on hand?
~ Dorie
July 17, 2014
Christmas in July? Part II
Earlier this week, I shared our Christmas tree felt ornaments. Today, going along that same theme of Christmas in July, I thought I'd share how I made a few Christmas tags out of old cards.
While we don't label every gift, I do like to place nice tags on gifts going out of our house. Before I recycled some of our Christmas cards, I decided to try to make a tag.
Using a template from another tag, I sought a good portion of the card to use as a tag. For the most part, this was easy. Some cards just did not lend themselves to this, so yes, they were just recycled. Others needed to be cut horizontally.
In the end, this was a very simple way to reuse store bought cards.
~ Dorie
July 15, 2014
Christmas in July?
Technically, it was January when we made these. Alas, it is now that I post it!
For Christmas {in just five months} the children will give these little felt tree ornaments as gifts to relatives near and far.
These were inspired by an idea from Pinterest. Our children did the majority of the work. I helped with a few of the steps.
Originally, we used wide tree trunks, but once we began sewing them together, we all thought some would look better with a thinner tree trunk. We adjusted the width of about half of them. Leaving the wider trunks for variety.
For the button placement, I marked a tiny dot with a Sharpie marker. The children then sewed a button over that spot.
Since these are for Christmas, we wrapped them loosely in pieces of wax paper for storage.
~ Dorie
Other Christmas 2014 Gifts Completed:
Homemade Journals and Sketchbooks
Easy to Make Hot Pads
Take Along Toy Car Play Mat
For Christmas {in just five months} the children will give these little felt tree ornaments as gifts to relatives near and far.
These were inspired by an idea from Pinterest. Our children did the majority of the work. I helped with a few of the steps.
All the materials we had on hand. We did have to use a variety of green felt since we were using what we had, but we were sure to match the felt colors for each individual tree. Also, some of the tree trunks are cranberry, but others are a deep purple. We matched the hanging ribbon to correspond with each individual tree.
Buttons were excess buttons from our button jar. The thread we used was originally bought for AWANA badge sewing. Since we have only used a bit of the entire spool, we had plenty to use for attaching the buttons.
Originally, we used wide tree trunks, but once we began sewing them together, we all thought some would look better with a thinner tree trunk. We adjusted the width of about half of them. Leaving the wider trunks for variety.
For the button placement, I marked a tiny dot with a Sharpie marker. The children then sewed a button over that spot.
Since these are for Christmas, we wrapped them loosely in pieces of wax paper for storage.
~ Dorie
Other Christmas 2014 Gifts Completed:
Homemade Journals and Sketchbooks
Easy to Make Hot Pads
Take Along Toy Car Play Mat
June 12, 2014
Keep Your Clothes Looking Good
Nasty, isn't it? Almost looks like vomit, or worse. Probably closer to the worse.
However, let me assure you - this is not bodily fluid of any type - human or animal.
It is residue from my washer machine.
Let me rephrase that.
It is from my oops, I forgot to clean the drum, filter, and seal, again, washer machine.
Sadly, this isn't the first time,
and it probably won't be the last.
You see, we use our washing machine (large capacity) on average 14 times each week. Remembering when to clean the filter, drum, and seal is easy. Finding a time when I and the washer machine are free, is next to impossible.
sigh.
Here's the irony in all of this.
I had a post about keeping your clothing looking good sitting in my draft folder. For months. I wrote it after a friend commented on how nice I keep my family's clothing.
Your clothing is always in such good shape. She had said that. Even went on to say how I needed to give her tips about the upkeep of fabrics.
Um, yeah. obviously. I'm that good.
So after one thorough cleaning of the washing machine and three more individual washings of the sheets and accompanying blanket, I felt I could share those tips with you. Since now I'm such an expert and all. Well, I do have crisp, clean sheets now...
12 Tips to Keeping Your Clothes Looking Good
- Read care instructions and follow them
- Use mild detergent - no dyes, no perfumes (your skin will thank you)
- Use less detergent (more is not better)
- Hand wash delicates
- Place delicates and clothing made of loose woven material flat to dry, place a towel under it if necessary to collect the drips
- Hang dry clothing - hang in a shady area or inside to prevent fading (do not pull it tight on line while it is wet - stretches material prematurely)
- Wash dark clothing inside out (dye will run back onto the good side keeping colors bright for longer)
- Spot clean if necessary (pretreat all stains as soon as possible)
- Start with durable clothing - whenever possible purchase or obtain clothing made of good quality materials)
- Mend and repair when necessary
- Use the power of the sun to brighten whites (hang a line in a sunny spot over green grass - it will brighten your whites)
- Above all, wash your washing machine according to the instructions in your owner's manual (I added this tip after the above incident)
~ Dorie
May 4, 2014
Homemade Take Along Toy Car Play Mat
Continuing on my homemade gift giving quest for Christmas 2014, I stitched this simple toy car mat for a certain little boy to open in December. {Every year, we try to incorporate homemade gifts, but this year, I want to tip the scale and have more homemade than store bought gifts. This is partly for frugality and partly for the challenge of it. Last year's efforts are seen here.}
The whole toy car play mat was made from old clothing or scraps of leftover fabric I had on hand.
An old denim jean pocket serves for the garage and bits of denim from old jeans made a rugged road.
{Yes, I am still using up the same jeans I cut apart for the other denim projects. You can see them here, here, and here.}
The 'country side' is composed of green, yellow, and brown scraps cut in hill shapes and sewed together.
The house may be my favorite scrap usage as the main portion of the house was one of my husband's shirts.
The whole mat folds to transport easily. I secured it with a large piece of blue felt and three buttons from my button jar.
As I am not a professional seamstress and I had no real plan or pattern, I think it turned out fairly well. There are certainly some things I could improve upon, but for the most part I am genuinely pleased by the effort and result.
Pairing the play mat with a few store bought toy cars will complete this gift. {Cars featured in the pictures were mine as a child. Now, my boys play with them.}
~ Dorie
Other Christmas 2014 Gifts Already Made:
Homemade Journals and Sketchbooks
Easy to Make Hot Pads
Related Posts about Up-Cycling Old Clothing:
A Dress to a Spring Scarf
How to Turn a Dress Into an Apron
March 3, 2014
A Dress to a Spring Scarf
Almost a year ago, I took a couple of my daughters' dresses and turned them into aprons. They still use them so I needed to find another use for a few of their old dresses. {We give away most of their old dresses, but always have a few which we recycle the material.} As it turns out, my daughters have joined the scarf craze of the past few years. This led to the following project...
{I used dresses without sleeves.}
To completely finish it off, I added a piece of satin with lace from an old slip for the ends. I didn't like the uneven result and wanted it to be straight, but still retain that slight ruffle and feminine appearance. {This is not in the picture above.}
~ Dorie
{I used dresses without sleeves.}
To completely finish it off, I added a piece of satin with lace from an old slip for the ends. I didn't like the uneven result and wanted it to be straight, but still retain that slight ruffle and feminine appearance. {This is not in the picture above.}
~ Dorie
Subscribe to:
Posts (Atom)